Sunday, 4 November 2012

Episode 10: More Ballast


In the last episode I said I’d talk about track power and some isolation issues that I came across, and I will get to this… But first I thought I’d update you on how the fix for the running green flue went. (Last discussed in Episode 7: Playing Sim City Part 1). 

Not well unfortunately. 

The recolouring the track bed with the same colour scatter as the scenic-mat (see above) worked excellently. However the scatter just didn’t take to the board very well and started to flake off. Disappointing, yes, but not the end of the world completely. 

It was always my intention in this project to properly add ballast scatter. In fact, it has already been purchased, hence why in the last Episode I had some spare to make faux wagon loads. The reason I have held back on this plan up until now was I was less confident with a) how well the ballast would stick to the board and b) what I should do about the removable track/board joins
.
At the same time as trying to fix the initial green-running glue I also tested adding some ballast scatter to a small siding to see how well it stuck and what it looked like (My method I will get to..) The result far exceeded my expectations which solves part ‘a.’ Part ‘b’ I was still unsure of but decided to start the ballast process on the rest of the layout regardless. 
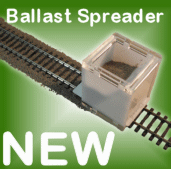

There are available, on the magic of the interwebs, a tool that will help spread the ballast evenly.  This looks like it will achieve us excellent results, however it spreads ballast between the sleepers and between the running rails as well as either side. Whilst this will look realistic, at this stage I do not want to add ballast between the running rails. This is purely because I have removable track and what to keep the ‘look’ uniform around the layout. I feel that any ballast between running rails may get stuck in there in the gluing process and then hinder my ability to remove the un-nailed down track needed to split the two base boards for storage.

I will therefore spread the ballast without the tool, and this will also give me a greater degree of control of where I put it. 


So, to get started spoon, pour, lump on some ballast to your layout. I used a small paint brush to spread it about evenly.


Next I added some of the specialist scenic cement seen in previous Episodes. Other modellers recommend the mix of PVA and water but there’s something reassuring about the word ‘cement’ that implies heavy duty sticking quality. I used the pipette method to drop the glue onto the dry ballast. Be very generous with your glue here I’d say. 

Leave this to dry, it will definitely take upwards of 12 hours so don’t be disheartened if you go back to it after 4 and it feels like it isn’t sticking, it will. 


I think it would be possible to leave it there, but to make sure it really is stuck I added a layer of PVA glue over the top which dries clear. This really should help to lock in the individual grains. The PVA layer usually takes a little less time to dry, and again be generous with the helping.


The results look great. I’ve left a few gaps in the ballast at this point - namely the aforementioned removable track sections, which includes the sidings in the centre of the board. I’ve also left out the far edges of the board which are handled in storage frequently as well as a section for a future level crossing.

I can also testify that the ballast has properly stuck as you’ll remember my boards are stacked vertically in storage and I’ve experienced no problems with it coming unstuck. A few lose bits may fall off at first but this is merely excess from the initial scatter. 

The whole process should take a few days. Once it was complete I laid the layout out in full and made sure trains were still running ok. At his point I decided to add in the gaps I’d left around the removeable track. It’s just going to be a case of ‘we’ll see what happens’ as I rig and de-rig the layout over time. I was perhaps a bit more sparing of the ballast in these sections to allow a bit of extra give for the removable track. In other regions you can really get the ballast up and in-between sleepers, here I’ve been less aggressive with coverage. 

As for the sidings, I’ve gone for a slightly different approach and laid ballast over the whole area. In part an experiment to see if I can apply a similar tactic on the mainline in the future.

A good question raised at the end of this is why have I added ballast scatter at all? After all I have the original scenic-mat, in ballast style, at the bottom of all of this gradually getting more and more covered up. Part of the answer was to resolve the issue of the running-green glue. But it’s also in part to the fact I am new at this, so it’s all an experiment in its own right. Whilst the scenic-mat was adequate to start with, I built up the confidence to add in a more realistic look (the ballast scatter) which we initially ruled out as a primary track underlay all the way back in Episode 3. 

So, what I will say is, if/when tackling a similar project from scratch again, I may rethink using the scenic-mat and going straight to the wood with all the scatter – grass and ballast. Ultimately the scenic-mat has been more messy than I thought it would be, both in moving it about and having to chisel some of it off for the roadways. HOWEVER, the good point of having a scenic-mat it is that it has provided a uniform base colour. There may be areas where ballast coverage has been patchy, or maybe the border between ballast and grass is not quite perfect - in these cases instead of wood showing through, the ballast mat shows through. Which is grey. And doesn’t look odd. Modellers may favour paint for the same undercoat effect, but in my case the scenic-mat works just as well. 


Thursday, 25 October 2012

Episode 9: A Question Of Ballast


It is my hope that the title of this episode will help Moody Blues fans stumble upon this blog by accidently spelling the title of their 1970 chart topping album wrong. Having explained this to you, the pun no doubt becomes a lot less funny, nevertheless in this episode I do intend to answer a Question Justin Hayward never got round to asking: 'What's the best way to fill my wagons?'


From the last two episode you will probably conclude that I 'lost the bottle' to build my own buildings and elected to buy pre made ones. You can do this with wagon loads - buy pre made, however it is not my intention to completely cheat my way through this project so here's a little idea I picked up from the excellent www.newrailwaymodellers.co.uk (If you haven't already visited this site, give it a look in, it offers a lot of advice for beginners like me) on making your own wagon loads.


How Is It that we need to 'make' a load?! - I hear you say. Why not just load up with lose scatter?

Yes, this is a cheap, easy and very athletically pleasing solution. However, what if the train derails? What if you accidently knock the wagon? You're going to create a mess of miniature aggregate all over your layout. Not to mention the extra weight you will be adding to the train...

So here's an idea to fake it. (OK so a little cheating will be involved today). The principle follows that of buying your own load. Making it look like there's more contents than there actually is...


Start by measuring out your wagons dimensions and cutting a piece of card to this size. Doesn't have to be special card, I've used a piece of Kellogg's finest. In fact I've glued two together for a bit more rigidity. This will form the base of your load.


Next up, add some smaller pieces of card to the load base. This will help raise the load up to make the wagon look full. 


A work in progress....


Add some glue and go nuts with some aggregate. It's Up To You what you use here, I've gone with some spare ballast (hence title) scatter which I intend to use in the near future for my layout. You may also want to add a layer of glue over the top almost immediately using my afore mentioned pipette method to really help the ballast stick.

Go ahead and leave it to set/dry over night or over an equally large period of time.


And here we have the wagons 'full' with ballast load. I found I had to trim the card again as it must've soaked up the quantity of glue I used like a sponge. Actually, I say 'full' - it could benefit from being raised up a tad - but that's the beauty you can adjust as required whereas purchasing readymade alternative won't allow this (easily).

You get The Ballance of low weight, cheapness (It only cost me £1.99 for a big ol' bag of ballast scatter - of which I've used only a very tiny amount here) and something which looks good. In fact I think this looks better than a bought option as, well it's real aggregate!

In the next Episode 'Every Good Boy Deserves Fish Plates' we'll look at a an issue regarding track power and isolation...

Episode 8: Playing Sim City: Part 2


Last time I talked about buildings and my town/village scene. These need to inevitably be accompanied by some roads.

As per usual there's a range of options... 

We could paint the road on. This option is preferred by many modellers and looks very good. However my predicament is that the entire board is covered with ballast-mat and whilst stripping it off in patches is an option; stripping it down to the bare wood again is going to be difficult. 

We could opt for a tarmac coloured scatter, but these may provide the same or similar texture as the green (grass) and I don't think that would feel right...


...So I've found some of this! It's sticky back road-in-a-strip from Gaugemaster and it's pretty cheap. 


I've also got myself some of these! Little sticky paving slabs.


First job is to mark out where you want your road to be constructed.


Then strip back the ballast-mat with a chisel. The goal is to get as much of the wood showing as possible but it is OK if it's not 100%. We are going to stick over it after all! Just as long as it's as smooth as you can manage!


This was both messy and irritating but eventually the area looked something like this!


The paving slabs are sticky - but with the stuck on walls of my old plastic buildings fresh in my mind, it's likely that overtime they will become unstuck. Also don't forget they're not going down onto a completely dust free and even surface!

I therefore will lay them out first to get an idea of how they look and then glue them down with PVA. (This is actually recommended by Metcalfe). 


The road is opened! (I wish they'd finish the roadworks on the M1 this quickly...). Looks good actually!


Now that I'm happy with the way it looks and where it is, I can expand as necessary to a larger town plan. I used tweezers to help me lift and replace the tiles. It took all day but the result is worth it.


Here is a work in progress shot. The problem with planning out the town is I've had to do it on quite an ad-hoc basis. It's difficult to quite judge the size of buildings in the shop, but hopefully I've left room for future additions.


I'm also going to future proof the layout by not modelling heavily over the gap in the two boards. i.e. keeping roads at 90 degree angles and not continuing on complex scenery. This should theoretically allow me to one day add a 3rd board in the middle to extend the layout outwards... but this is way off in the future... 

At present I'm waiting for things to dry so more pictures coming soon!

Episode 7: Playing Sim City: Part 1


In the last episode (Playing God) you'll remember I took to adding some greenery to the board. Most of which was a large success - apart from a tiny flaw in which the top coat of glue being dyed by the scatter and running creating stained patches of ballast-mat. (See bellow at the top of the picture).


As discussed last week I came up with a plan to combat this...


Fortunately for me, you can purchase the ballast coloured scenic mat I've used in scatter form. Therefore I've added some of this to the offending areas, this time using a pipette to apply the glue over the top as not to discolour it. 


At the time of writing I'm waiting for this to dry. But it's already looking much better and is helping the green area run with the curvature of the track bed.

Anyway, now the landscape is developing nicely it's time to move on and start thinking about populating my layout with some buildings to make it look, well, a) interesting and b) real. 

  
If you look back at previous episodes you'll see I already have some buildings... Some of which appear to change or move location....

Along with all my rolling stock, built up in my childhood, I also had an array of buildings, platforms and trackside paraphernalia. 

Most of these buildings come from the cheaper end of Hornby's back catalogue spectrum and feature a mix of cheap grey plastics, paper-stuck on walls and low quality finishes. I don't think it's helped that they haven't stood the test of time very well being stuck in my parents loft for so many years - the sticky paper finished walls are coming off, they're very dirty and dusty and some have broken all together (Possibly in transit, more likely my Dad not putting them in the right box..). 

I'm not knocking Hornby's efforts here. In fact, you can find pictures on their website where they construct quite plausible and good looking layouts using them. Mind you, they are trying to sell you them... Anyway, they appealed to me once and I'm pretty sure they're doing a good job at appealing to kids now. Kids who want a cheap, quick addition to their layout to add interest. That was absolutely fine then, but it looks no good on my layout now.

Most of them have found their way into the bin. (I have a lot of excess platform pieces that are in good condition and looking for a good home - so please get in touch!).

It won't shock you to find out there is a plethora of higher-end, much better looking options on the market. If you're the die-hard serious modeller then chances are you'll be making your building from scratch. I wouldn't know where to begin on such a subject so let's rule that out. 


Some companies do very convincing card kits, such as the Metcalfe example above. 


Others offer a pre built building in white, as a blank canvas. 

Now, I've never been much of an artist and I'm terrible with building kits. I'm sure a seasoned pro could turn out a card kit like the one above but I think I'd just create a gluey bent mess.


Thankfully, Hornby have waded back into the game with some very good looking die-cast resin structures. All the buildings from the above feature in Hornby's 'Skaledale' range. And I must say I'm impressed with their looks and features. 

You have to ask yourself, am I going to get more pleasure out of making the building, or looking at the building?... Well I suppose if you're good at making them, then the answer will be both, but as we've already established I'm going to be next to useless at trying to make my own kit. 

I know they're going to look great out the box, and I am a sucker for Hornby products, so I have treated myself to some Skaledale buildings. (In fact: if you remember from the last episode, I had already purchased a couple last month). The added bonus is, unlike some of the kit or self produced buildings which might not stand the test of being moved in and out of storage regularly (as I need them to), the Skaledale buildings are fairly rugged and can be moved around easily/stored in boxes. There's also a HUGE range to choose from (*cough* future Christmas present idea for me *cough*) and many of the range is inspired by real life buildings, so you'll be able to pick up Gothland Station on the North Yorkshire Moors Railway or Dent Station on the Settle-Carlisle line to name but a few.

I will stress again though that if you CAN build kits well and don't need to move them about alot then this is a much cheaper and rewarding route to take...


Here's a sneak peak at some of my buildings. You'll be able to tailor your town to an era or geographical location. But as I'm going with the 'it could be anywhere and anywhen' approach I've got a mismatch of different period/architectured highstreet buildings. Mind you, have you ever been down Epping High Street - it looks like this anyway!

But wait! I hear you say. There are roads and pavements too! I'll get to that next time....

Tuesday, 9 October 2012

Episode 6: Playing God


Yes, yes, I know it's been a while. But I promise I have been busy working away. Both with real life things and actual important things like Model Railwaying!

In the beginning there was ballast-coloured-scenic-mat and it was good.


But now it's time to start thinking about improving on 'good' and developing the scenery. Or in other words to start adding the Green. 

If you head back to 'Planning Permission' (Episode 3) you can refresh yourself on the scenic materials we have on offer to us and how I originally arrived at the decision to first lay a ballast coloured matt and then secondly add some grass/field based green scatted. It's now time for that second step.


Scenic scatter comes in a huge variety of colours, textures, sizes and coarsenesses. If you're feeling particularly dramatic you'll find colours such as red/orange/brown for quarry, industrial and maybe even autumnal effects. You'll also find a variety of rocks, gravel and mineral effects in the Scenic Scatter Isle of your model shop/ebay. But we're going to start simple with some green for a field/grass effect. Again there'll be a large choice on which 'Green' you choose. I went for a light-green bag and a dark-green bag which I shall mix together. I'm hoping this will create a more natural look, rather just using one shade of green.


Scenic scatter is rather hard to describe. It looks like powder paint, but feels a little more 'fuzzy' than that. On returning home I mixed the two colours 50/50 in a container. That isn't the best picture in the world above, but if you look carefully - just in the top right of the picture - you'll see the bag of light green scatter which has been mixed together with the dark green on the left. 


I started with a rather in-offensive test patch area to the corner of one of the boards. As before I mixed PVA glue with a bit of water (I'm not quite sure of the ratio I used here probably about 70/30, you want the glue to spread easily but not to be runny like water) and painted this on liberally to the board. Remember PVA glue dries clear so it doesn't matter if you get it on an area you didn't mean to, but do try to avoid the track. Obviously. 

Next sprinkle on your scatter. I don't think there's a right or wrong way to go about this but I used a spoon. This way you can dump large amounts of scatter; as well as being able to tap the spoon with your finger to scatter more finely on the edges of the glue. 


Eventually we will add a second coat of glue on top of the scatter we have just laid - however I found it useful to pat down the scatter using either my hand, the back of the spoon, or even more effective - a folded up piece of paper. Don't be too forceful or you'll end up getting the scatter stuck to the paper, just lightly press down and this helps the scatter to stick to the board as well as helping it to spread evenly. 

I let the test section dry over night and once I was happy that nothing had gone terribly wrong I went ahead and continued to add green elsewhere on the layout. It might be worth having a small piece of wood with a section of track nailed down to for these testing purposes. However I don't have such piece of small wood so this is why I just used a small section of the layout for my scenic test.


After repeating the process on a larger scale this is what one of the boards looked like. You'll notice the creases in the scenic mat are more obvious here. I think this had something to do with the glue still being quite wet, this eventually evened itself out after the second layer of glue and more paper-patting.


I purchased a bottle of proper 'Scenic Cement' from my local model shop. I'm pretty sure it's very similar to PVA in its qualities but I used this partly out of curiosity and partly as I know it a recommended product amongst model railwayers. Once the first layer dried I applied a layer of this. Again be generous with your glue helping but try to be controlled on the edges of the scatter. We'll come onto a problem that this caused soon...  


So here's a picture of the end game after the 2nd layer has dried and I'm rather pleased with the result! The dual colour has really worked a treat and the 2nd layer of glue gives the scatter a nice finish.

The little coal dump by the way is from the Hornby Skaledale range - I will get onto buildings and ornaments on a later episode. 

There was however a slight problem. You'll notice top left of the picture there's an unsightly patch of green that's not following the line of the track? This isn't a rogue patch of scatter - this is where the glue has run. When you paint on the 2nd layer of glue it is almost unavoidable that your brushes contact with the scatter doesn't eventually dye the rest of the glue a pale green colour. This rather unfortunately is the result of that green died glue running!


You can see it more evidently on this picture occurring in multiple locations! This does look really sloppy but thankfully I've come up with an idea to solve it. You remember I said scatter comes in various different forms and colours? Well thankfully they also make a scatter version of the grey ballast. I'm hoping that adding some of this to the offending areas and - here's the clever part - dropping on some glue using a pipette so that I'm not risking the glue being discoloured by the scatter will solve the problem! 

This really does highlight the importance of being controlled with your 2nd layer of glue! I'd even recommend not gluing right to the edge and instead waiting for this to dry before pipett-ing the boundary between grey and green.

You'll also note that there is still a large area in the middle of the board that's still grey. As I add buildings so will I work out where more scatter needs be applied. We'll talk about buildings another time.


Until then here's a few more close ups of trains and good looking green!


Monday, 10 September 2012

Episode 5: Pins & The Grand Opening


So this is where we left off: 


A rather blank looking canvas of ballast, grey track mat glued to the baseboard. Next up we need to actually lay the track down.

For this you'll need some 'pins' which are essentially a model railwaying term for 'nails.' Again you'll get these from any decent model shop and of course eBay. I got mine on the same trip excursion to John Dutfield in Chelmsford as the roles of track mat. You shouldn't have to spend a fortune on these... I'd avoid the Hornby branded ones as you only got about 10 in a packet. eBay will definitely be able to furnish you with a bag of 50 or so for half the price. There's very little difference in track pins, as long as you get ones for 00-track they should fit no problem.


Some model shops will also stock a sort of 'pin applicator' to PUSH said pins into your baseboard. On research however these only look like they'll really work if you've got a softer baseboard, one made of cork or jelly for example and I can't really see them working very well on our plywood. Therefore we'll opt for the good old fashioned WHACK approach. (Off to homebase for a hammer we go - don't forget it needs to be narrower than the width of your track gauge. In the case of 00 track this is 16mm). 


Next up I laid out the track in full plan once more. Partly to see how good it currently looks but mostly because I'd recommend doing this rather than taking an as-you-nail approach for the reasons I'm about to explain. 

Laying out your full plan first will enable you to make absolutely sure there are no kinks in the track (by this I mean where two pieces join) and to make sure double/triple tracking is correctly spaced. If you head back to http://www.freetrackplans.com/Geometry.php you'll be able to double check some of the official track spacing measurements. If you've chosen to have crossovers and loops that diverge from a single oval these track spacing's SHOULD take care of themselves. Referencing my layout you'll notice there's a crossover between the inner and 2nd ovals and that the 2nd oval spur the outer loops. I've followed the advice on Free Track Plans Dot Com Forward Slash Geometry such that these all have uniform spacing between ovals. You can of course choose to ignore these geometries, which I'll mention are officially supplied by Hornby, and opt for your own but you'll need be absolutely sure the space between lines accommodates your stock without accident!


To double check it's worth loading your ovals up with some stock to make sure their loading gauges don't overlap. The loading gauge is the space required either side of the rails to accommodate your rolling stock. On curved track your stock will have a natural 'overhang' from the bogies. If the loading gauge does overlap it means two trains may touch each other as they go round curved sections of track. Here I've chosen some of my longest ex-BR Mrk iii and iv coaches (which logically being long have large loading gauges!) and they fit perfectly. (I'll also mention they work perfectly on the inner two ovals too..).


So no more dawdling! Time to nail it down. Keep making sure your track hasn't shifted, maintaining your track spacing as you whack away. I actually found that because of the rough surface created by the track mats the non-nailed down track didn't shift about as much as I expected. The ply wood really did take the nails with ease and the job was done in a good 20 minutes!


Here's a picture of my board sitting in storage with track nailed down. Remember the gaps (top right) enable sections of the non-nailed track to be removed for storing.

You'll remember from the last episode that I talked about the track mat being a bit 'flaky' and some of the ballast effect ... erm ballast... was coming off and making a mess. My flat mate, Mike Cramer (full credits there matey), suggested: 'Isn't there some sort of spray on glue you could use?' Why yes Mike that's a genius idea! Now you could go and buy some 'glue spray' from your local hardware sure - such an item does exist. However I just made up a solution of left over PVA glue and water (this time it was more a 50:50 ratio) and used an old detol style kitchen spray cannon to apply the glue. Be quite liberal with it and apply as much as possible. At this stage I do wish I'd thought of it BEFORE nailing the track down, and I hope you're not following this blog in a similar step by step process as you'll also be regretting not doing the same! This was mainly because I had to be careful not to get any spray on the track. I therefore had to 'miss out' areas of the track mat which is still causing some shards of ballast to come unstuck. I will say however that this has helped massively the problem. You'll notice from the picture above that some areas look 'discoloured' - this isn't the shadows in my boiler room this was caused by the glue. Now, I rather like this, as in real life ballast and rock is not a perfect uniform colour so it has given my layout a more natural effect. If you're not so keen on that idea then I'd recommend going for a track mat that was more felt based than mine thus avoiding the need to spray-glue the flakey bits. 


Next, well I had some fun with it next!